How to create timeline in Excel
Edraw Content Team
Do You Want to Create Timeline?
EdrawMind helps move ideas forward, faster and better. Learn from this guide to know everything about how to create a timeline. Just try it free now!
Timelines are constructed to avoid mismanagement and panic while dealing with various genres of projects. Experts suggest creating a timeline to plan and schedule the work project professionally. As a result, individuals can focus on the critical and technical aspects of the projects closely and increase their chances of success.
You can create timelines on multiple forums such as Excel that allow the users to craft a timeline from scratch. In this article, we will provide a detailed guide on how to create a timeline in Excel with simple steps. Moreover, we will also recommend a powerful alternative that can construct multiple timelines in an enhanced ecosystem.
1. How to Create a Timeline in Excel
Excel is commonly used to manage tabular data by creating tables and inserting the data. By adding formulas, you can conduct your calculations. Apart from these functions, Excel can also generate basic timelines by using its provided options. To construct a simple and easy timeline in Excel, we will use two methods that will be described for you to learn how to create a timeline in excel.
Using a SmartArt Graphic of Timeline
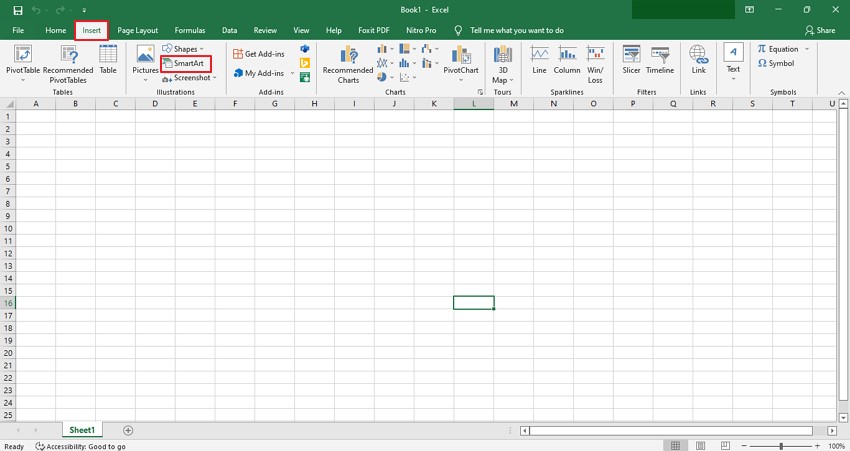
Step 1: Open SmartArt Graphics
Open the program Excel on your PC and quickly navigate to the "Insert" tab. In the category of "Illustrations," tap on the "SmartArt" option. A new window will display on your screen featuring SmartArt graphics.
Step 2: Select Timeline Design
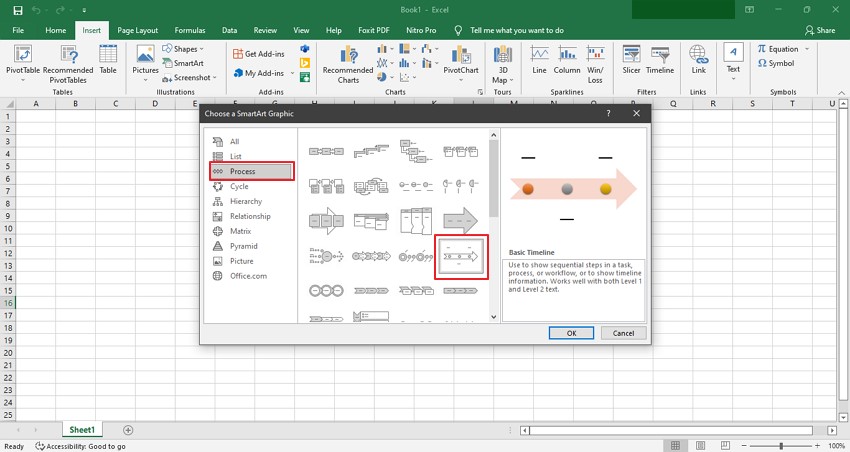
From the window, click on the "Process" tab that will display timeline layouts for you. Click on the "Basic Timeline" graphic to begin.
Step 3: Add Timeline Content
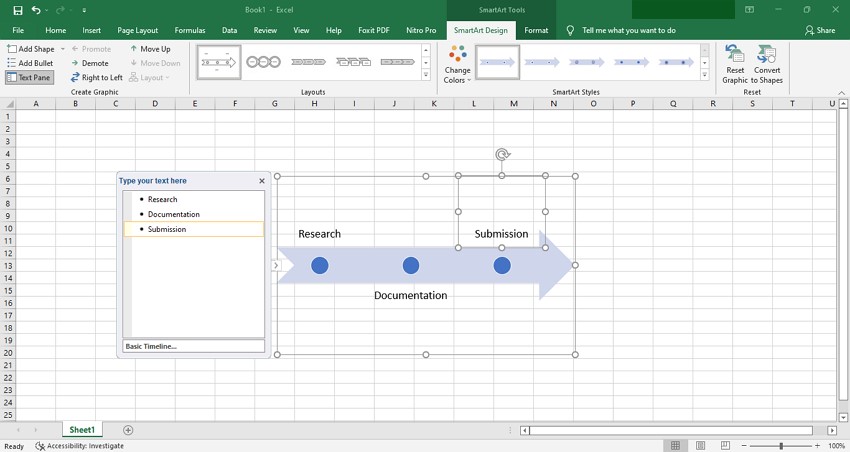
Once the basic timeline graphic is uploaded, you can start editing the timeline by adding content on the "Text Pane."
Step 4: Add or Delete Shapes
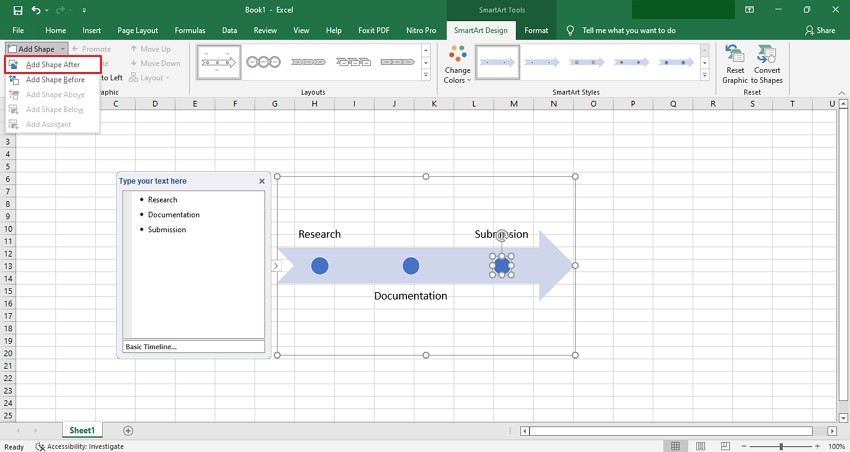
If you want to add more shapes after or before Task 3, click on the circle of Task 3 and then tap on the "Design" tab. Click the "Add Shape" category and then select "Add Shape After" from the small menu.
To delete any shape, click on the text pane of the particular task and erase the text. By doing so, the shape will also be removed.
Step 5: Adjust the Place of Task
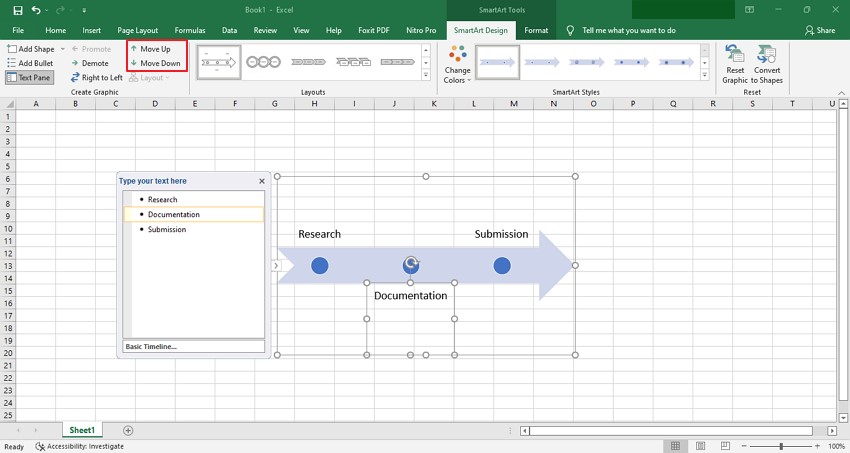
To adjust the position of any particular Task, first select the task that you want to move. Now proceed to the "Design" tab and then choose the "Move Up" or "Move Down" option from the category of "Create Graphic."
Step 6: Add Customizations
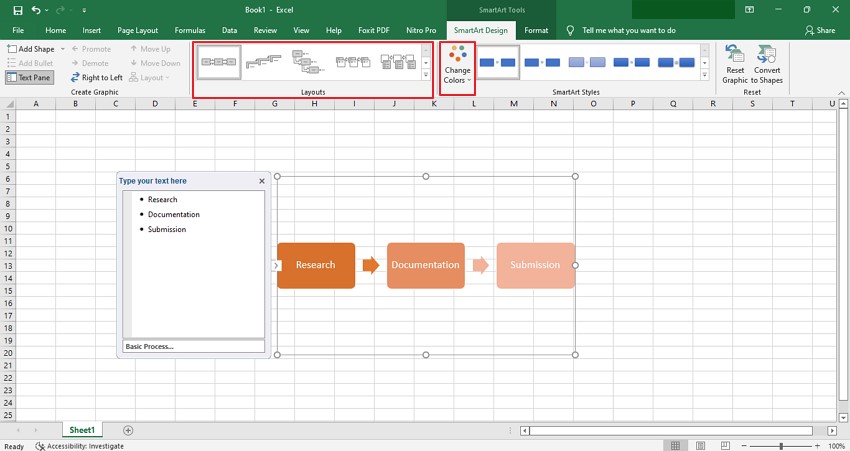
Excel provides you with options to customize the timeline by changing the layouts and colors. To modify the layout of the timeline, begin with selecting the graphic. Now proceed to the "SmartArt Design" tab. From there, choose "Layouts" and explore the various layout styles.
You can also change the color of the graphic by selecting it first and then reaching the "Design" tab. Go to the "Change Colors" option and apply the favorite color to it.
Using an Inbuilt Timeline Template
Another easy way to construct a timeline on Excel is by using its inbuilt timeline templates. To access the templates of the timeline, open Excel and then tap on the "File" button displayed on top. Select the "New" option from the left section and then type "Timeline" in a search box. Excel will display different timeline templates that you can use by right-clicking on them.
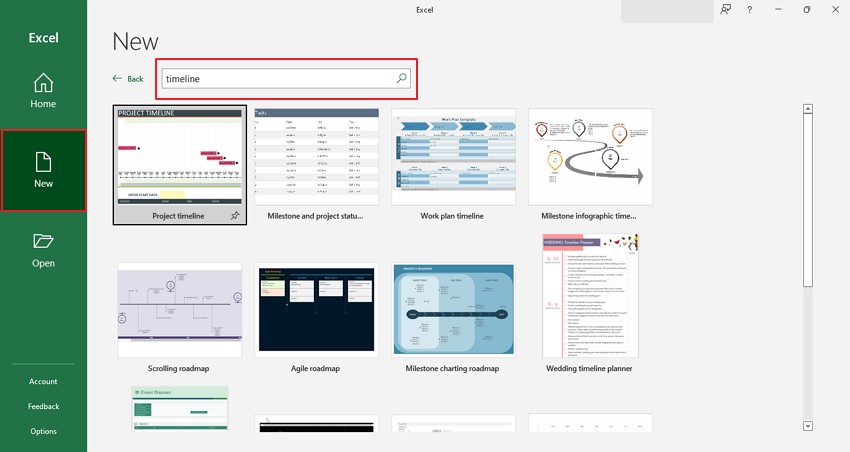
On Excel, you can find various pre-made templates and can edit them using the tools. Here are some good examples of the timeline templates in Excel.
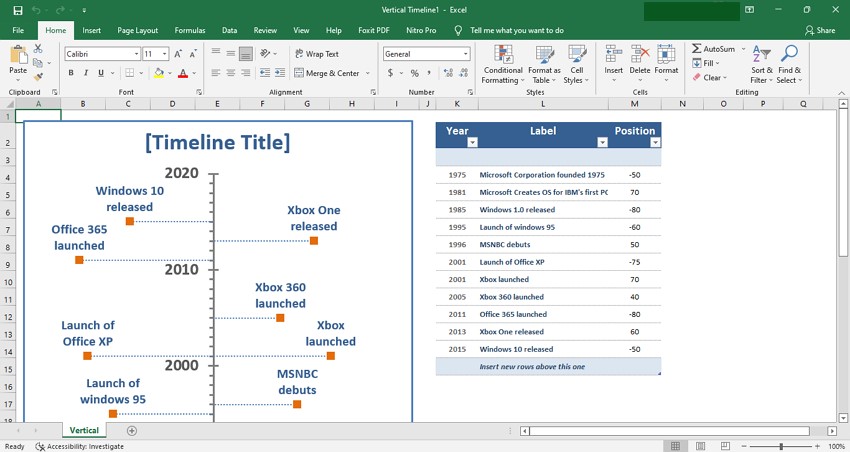
Vertical Timeline Template
This type of template is used to depict the information that grows or develops over a period of time in vertical order. By adding and editing the data labels, markers, axis, and other chart elements, you can display the list of events across your project and can plan further strategies accordingly. To set a milestone, you are bound to set the position across the template manually.
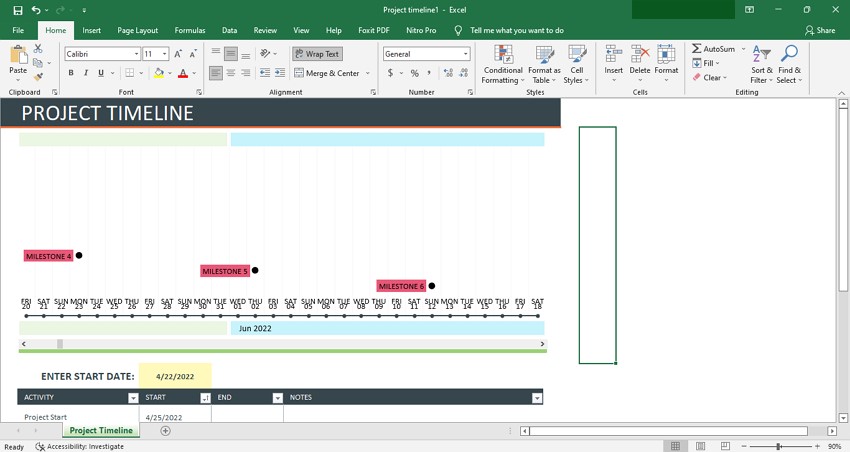
Timeline Template for Milestones
Through this template, you can construct the timeline of the milestones in a visually graphic way. You can observe the time of completion of the milestones and can add important notes next to them. Thus, this template gives a perfect chance to complete the due tasks in a timely manner.
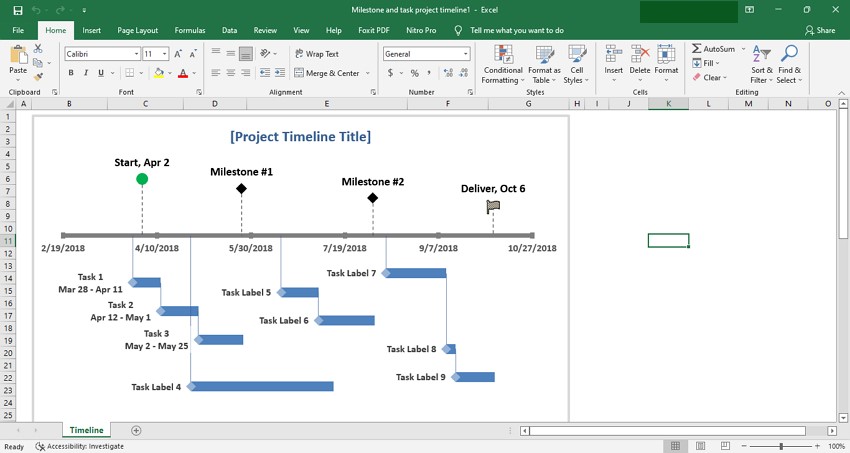
Milestone and Task Project Timeline
The milestone and task project template displays an extensive section of the milestones that will take to complete the entire project. By doing so, you can evaluate and specify how much time a particular milestone will take and in what time period the project will be completed. You are also bound to set the names and positions of the milestones across the template by yourself.
2. Limitations of Using Excel to Create a Project Timeline
Are you done creating a timeline in Excel but finding the results unsatisfactory? That's due to the number of limitations that Excel has, which cannot help in generating extraordinary results in a timely manner. Here are some limitations that you should read before using Excel to create timelines:
- Manual Procession: All the procedures of creating and editing timelines in Excel can only be done through manual power. It reflects that Excel does not help you in constructing timelines efficiently without spending too much energy.
- Time-Consuming: The user interface of Excel is not designed as a way to create multiple timelines in a quick responsive way. If any little error occurs, you have to redo the whole process again, which can be time-consuming.
- No Real-Time Collaboration: Big corporate projects demand team efforts and require a collaborative tool. Unfortunately, Excel does not provide a professional environment where individuals can collaborate as teams and can execute real-time editing.
3. How to Create a Timeline in EdrawMind
By eradicating all the errors and limitations of Excel, EdrawMind is a proficient tool for constructing captivating timelines. Along with the vibrant timeline templates, it offers peculiar key features to customize the timeline in accordance with the demand of your work project. Read the below instructions to generate a timeline instantly through EdrawMind.
Step1 Begin with Timeline Template
Launch EdrawMind on your device and tap to open its interface. Choose your preferred timeline template from the offered options, such as vertical or horizontal timelines. Double click on the selected option to start.
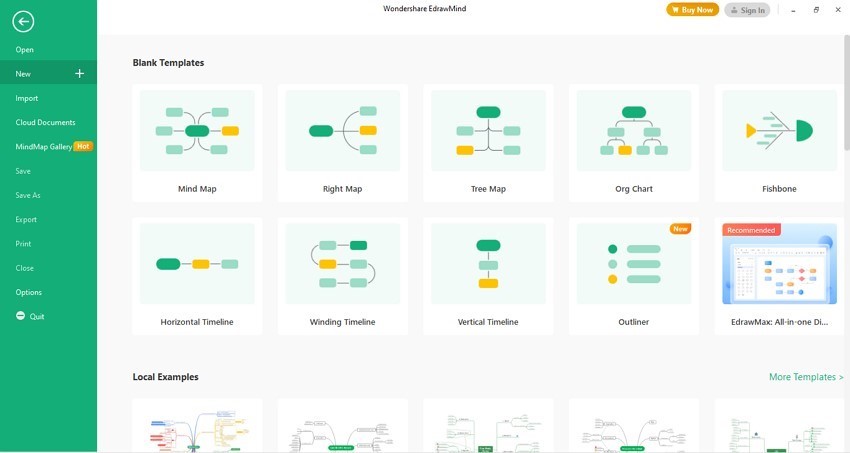
Step2 Generate Timeline
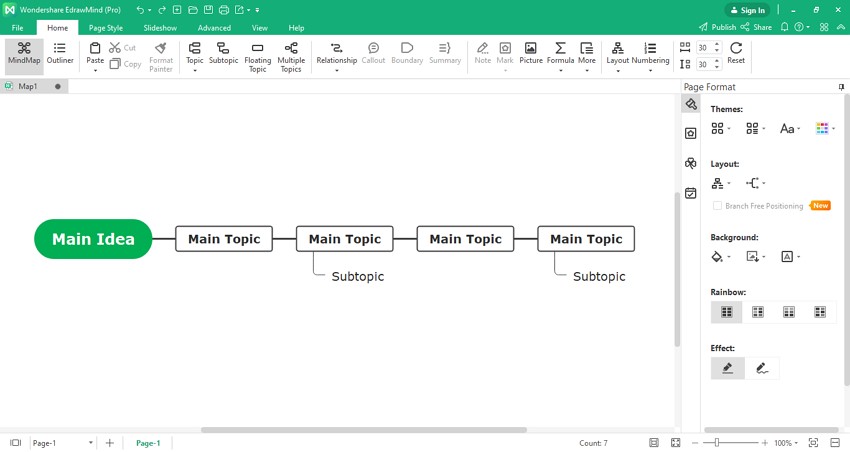
After picking your desired template, you can enter more additions to it by using Enter and Tab buttons. To add more Main Topics at the end of a timeline, press "Enter" from your keyboard. Or, to add Main Topic at a particular position, click on that cell and press "Enter." For adding Main Topics behind the selected Main topic, press "Shift + Enter." Moreover, for adding sub-topics, navigate to the particular cell and press the button "Tab" on your keyboard.
Step3 Personalize the Timeline
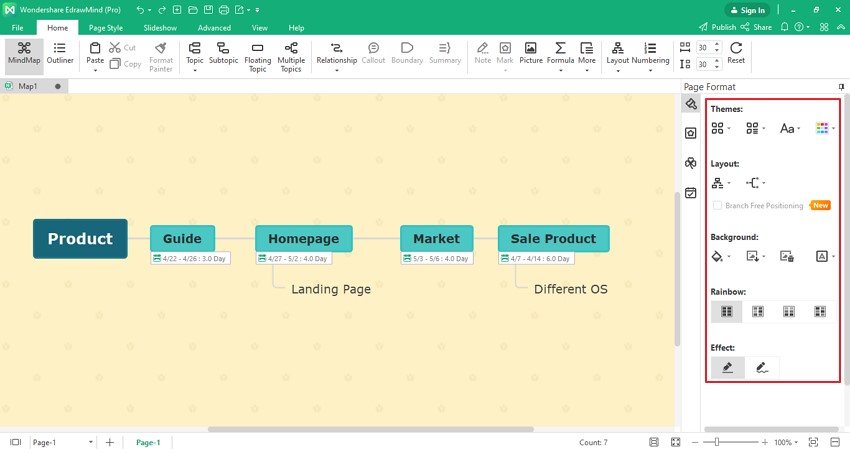
To add a personal touch to the timeline, navigate to the "Formatting" tab of this tool and change the color and text styles. You can remove and add new backgrounds to the timeline according to your preference. Also, add rainbow themes or clipart where needed.
4. Save an EdrawMind Timeline as Excel File
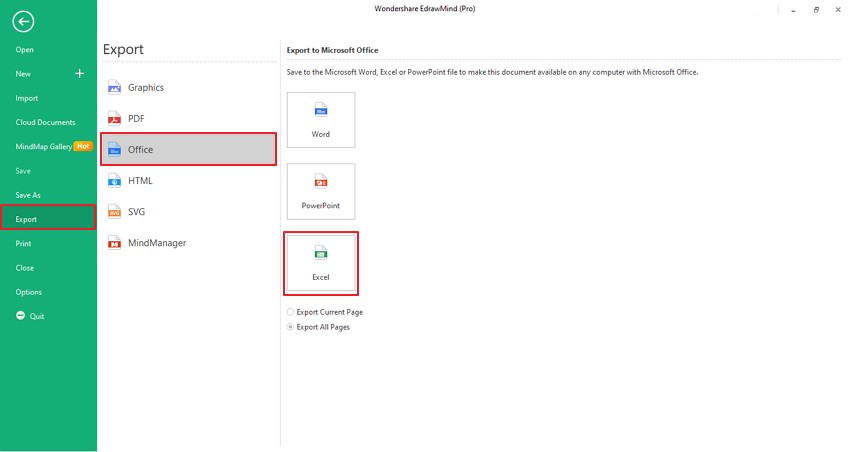
Do you want to save your EdrawMind timelines as an Excel file? This platform gives you the option to save newly created timelines as an Excel file on your computer. Just reach the "File" option in this tool and tap on the "Export" button.
Now choose either you want to export the current page or all pages from the "Office" export option. Now tap on the "Excel" and name your file. Click on the "Save" button, and your EdrawMind timeline will be saved as an Excel file.
5. Templates of Timeline in EdrawMind
Through this section, you will come to know that great examples of the timeline templates exclusively offered in EdrawMind.
- iPhone Development Timeline
![iphone development timeline]() Click here to download EdrawMind
Click here to download EdrawMind
(For Win)Click here to download EdrawMind
(For Mac)Click here to download EdrawMind
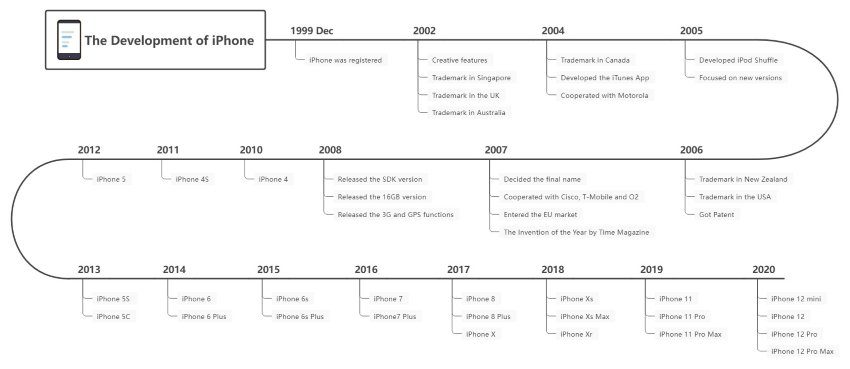
(For Linux)This example of a template is used to see the evolution of a certain thing within the years through a winding structure. For instance, you can check the development progress of iPhones and can add relevant images and numbers for a perfect illustration.
- Marketing Planning Timeline
![marketing planning template]() Click here to download EdrawMind
Click here to download EdrawMind
(For Win)Click here to download EdrawMind
(For Mac)Click here to download EdrawMind
(For Linux)Through this kind of template, you can effectively strategize and plan for the marketing of a particular product. This is a horizontal diagram, and you can add several factors such as target audience, required budget, and relevant goals. You can highlight critical paths and essential data to get a clear notion of the scope of your product.
- ERP Project Timeline
![erp project timeline]() Click here to download EdrawMind
Click here to download EdrawMind
(For Win)Click here to download EdrawMind
(For Mac)Click here to download EdrawMind
(For Linux)This sort of template is used to design and plan for developing software or applications that demand extensive research. Through this, you can categorize each research data and can also draw a Gantt chart for displaying the time limits and due tasks properly.
6. Key Takeaways
If you don't know how to create a timeline in Excel, this article has provided a comprehensive guide to completing this task. However, if you want to utilize an advanced tool that is not time-consuming, we suggest you EdrawMind for constructing exceptional timelines for both small and large scale purposes. This tool offers advanced features to design a timeline but in an easy-to-use interface.
Non-professionals can utilize this platform and can generate multiple customized timelines in a collaborative manner. It also provides different stickers and clipart for making your timeline more attractive and understandable. You can also save your timelines on Dropbox or import your saved timeline from Dropbox from editing.
You May Also Like
Creating Mind Maps With AI: A Quick Step-by-Step Guide
HOW-TO & TIPS
Creating a SWOT Analysis Chart With EdrawMind AI
HOW-TO & TIPS
How to Make a Mind Map in Word
HOW-TO & TIPS
How to Open and Edit a Mind Map in Office 365
HOW-TO & TIPS
How to Create a OneNote Mind Map
HOW-TO & TIPS
